


Before you even think about laying a new set of strings on your racket, you need to get your toolkit in order. At Mantis, we know from experience that having the right equipment ready to go makes the difference between a clean, professional job and a frustrating mess. To get started, check out our guide on how to choose a tennis racket. We’re talking about a few non-negotiable tools that set you up for success.
Gathering Your Essential Toolkit To Restring a Tennis Racket
Taking the plunge into restringing at home is a fantastic step for any serious player. Just like the racket frame itself is a critical choice, the tools you use to look after it are every bit as important. Assembling your toolkit first stops any of those mid-job panics where you realise you're missing something crucial. Think of it as your pre-match ritual; good preparation leads to a better outcome. For anyone still weighing up their main piece of gear, our guide on how to choose a tennis racket has some great foundational knowledge that goes hand-in-hand with learning to string.
The absolute cornerstone of any stringing setup is the stringing machine. This will be your biggest investment, but it’s the heart of the whole operation. Machines range from simple drop-weight models, which are a great starting point for beginners, all the way to sophisticated electronic machines that give you incredibly precise, constant-pull tensioning.
A quality stringing machine does more than just pull strings; it securely holds the racket frame without causing stress or warping, ensuring the integrity of your equipment is maintained throughout the process.
The Non-Negotiable Tools
Beyond the machine, there are a few smaller tools you simply can’t do the job without. We see these as the bare minimum for anyone wanting to learn how to restring a tennis racket at home.
- Sharp Cutters: A clean cut is vital, both for snipping out old strings and trimming the new ones. If your cutters are dull, they can fray the string ends, which makes threading them through the grommets a real pain.
- Bent-Nose Pliers: These are a lifesaver for getting into tight spots. You'll find yourself reaching for them to guide strings through shared holes, help tie off knots, and even pull out stubborn old grommets.
- An Awl: This sharp, pointed tool will become your best friend when you come across a blocked or tight grommet hole. It clears a path for the new string to pass through smoothly, preventing damage and a lot of frustration.
Recommended Extras for Precision
Once you’ve got the basics covered, a couple of extra tools can take your stringing from good to great. They aren't strictly necessary to get started, but here at Mantis, we really recommend them if you're aiming for that professional-level finish.
A starting clamp is brilliant for holding that very first main string securely, giving you a firm anchor to work from. Also, a tension calibrator is a fantastic bit of kit that lets you check if your machine is actually pulling at the tension you’ve set. It ensures you get absolute accuracy and consistency, string job after string job.
Preparing The Racket For New Strings
Alright, with your tools laid out, you've arrived at the first real hands-on moment in your restringing journey. This part is about much more than just cutting out the old strings; it's a careful process of depressurising the frame safely. To learn more about how the strings themselves impact performance, check out our definitive Mantis guide to tennis racket strings. Here at Mantis, we can't stress this enough: a methodical approach at this stage is what protects your racket from damage.
If you rush this or cut the strings incorrectly, you can introduce uneven forces that warp or even crack the frame over time. It’s a completely avoidable risk.
The Correct Cutting Pattern
The most important principle here is to release the string tension evenly across the entire frame. Never, ever just snip one string and yank it out, or cut all the main strings before moving on to the crosses. This creates a sudden, massive imbalance in the forces being exerted on the graphite—the number one cause of frame distortion.
Instead, think of it as methodically letting the pressure off. The safest way to do this is to start at the centre of the string bed and work your way outwards, alternating between the main and cross strings.
- First Cut: Start by cutting one of the two centremost main strings.
- Second Cut: Immediately follow up by cutting the centremost cross string that intersects it.
- Work Outwards: Continue this pattern, moving from the centre to the outer edges. Snip a main, then a cross, then the next main, and so on.
This sequence ensures the tension drops gradually and symmetrically, keeping your frame stable and secure. Once all the strings are snipped, they should pull out easily from the grommet holes.
Following a centre-out cutting pattern is the single most effective action you can take to prevent frame warping during the restringing process. It equalises pressure release, safeguarding your racket’s structural integrity for years of play.
Inspecting Grommets and The Frame
With the old strings gone, you’re left with a bare frame. This is the perfect opportunity for a quick but detailed inspection. Your primary focus should be the grommets—those little plastic tubes lining the string holes. They act as a crucial protective barrier between the sharp edges of the frame and your brand-new strings.
Look closely for any signs of wear and tear:
- Cracked Grommets: Check for any visible cracks or splits. These can create sharp edges that will shred a new set of strings in no time.
- Flared or Worn Grommets: See if any grommets are excessively worn down or have flared out from the tension of previous string jobs. These won't guide the string properly.
- Blocked Holes: It’s not uncommon for the tip of an old string to break off inside a grommet, blocking the path for the new one.
If you find any damaged grommets, they absolutely must be replaced before you go any further. It's a small bit of maintenance, but it’s crucial for the longevity of your new string job. Think of it as preparing a clean and safe canvas for your new string bed.
Installing the Main Strings with Precision
This is where the magic really starts to happen. Getting the main (vertical) strings right is the foundation for your racket's power, control, and overall feel. Before you get started, we recommend looking at our definitive Mantis guide to tennis racket strings. Think of it as laying the groundwork—get this part right, and everything that follows will be so much easier.
First things first, let's measure out the string. For a standard two-piece job, you’ll need about 12 metres (40 feet) of string in total. The easiest way to handle this is to split it right down the middle: 6 metres for the mains and 6 metres for the crosses. This gives you plenty of slack to work with, so you won’t have that heart-sinking moment of running out of string with just a few grommets to go.
Before you even think about threading, make sure your racket is properly mounted. The mounting posts should be snug against the frame at the head and throat, but not so tight they're squeezing or distorting it. Give it a little nudge—if it doesn't move at all, you're good to go. This stability is non-negotiable for an even tension job.
Anchoring and Pulling the First Mains
With your frame locked in and your 6-metre piece for the mains ready, it's time to get started. You'll begin by threading one end of the string from the head of the racket down towards the throat. The goal is to centre it, leaving an equal amount of string on both sides.
Your first two main strings are your anchors. Clamp one of the centre mains near the head to hold it in place. Now, feed the other centre main through your machine's tension head and pull it to your desired tension. Once it's pulled, secure it with your second clamp, placing it close to the throat. Just like that, you’ve created a stable base to work from.
Learning to do this yourself is a game-changer, not just for your wallet but for the level of control you have over your gear. In the UK, a professional restring can set you back anywhere from £12 to £20, depending on labour and string choice. Many local clubs offer this service, and you can check out typical pricing structures.
Doing it yourself, however, puts you in the driver's seat. While there's an upfront cost for the machine, it pays for itself over time.
Estimated Restringing Costs vs DIY Investment
| Expense Item | Typical UK Professional Cost | Estimated DIY Cost |
|---|---|---|
| Single Restring (Labour) | £12 - £20 | £0 |
| String Set | £5 - £25+ | £5 - £25+ |
| Total Per Racket | £17 - £45+ | £5 - £25+ |
| Initial DIY Investment | N/A | £150 - £500+ (for a machine) |
As you can see, after just a handful of restrings, the initial investment in a home stringing machine starts to look pretty smart, especially if you break strings often or have multiple rackets to maintain.
Pro Tip from Mantis: Always give your clamps a quick wipe-down before you start. Any built-up gunk or debris can cause a clamp to slip, which instantly drops your tension. Even worse, a dirty clamp can fray or damage the string you've just carefully pulled.
The image below perfectly captures that critical moment of applying tension.
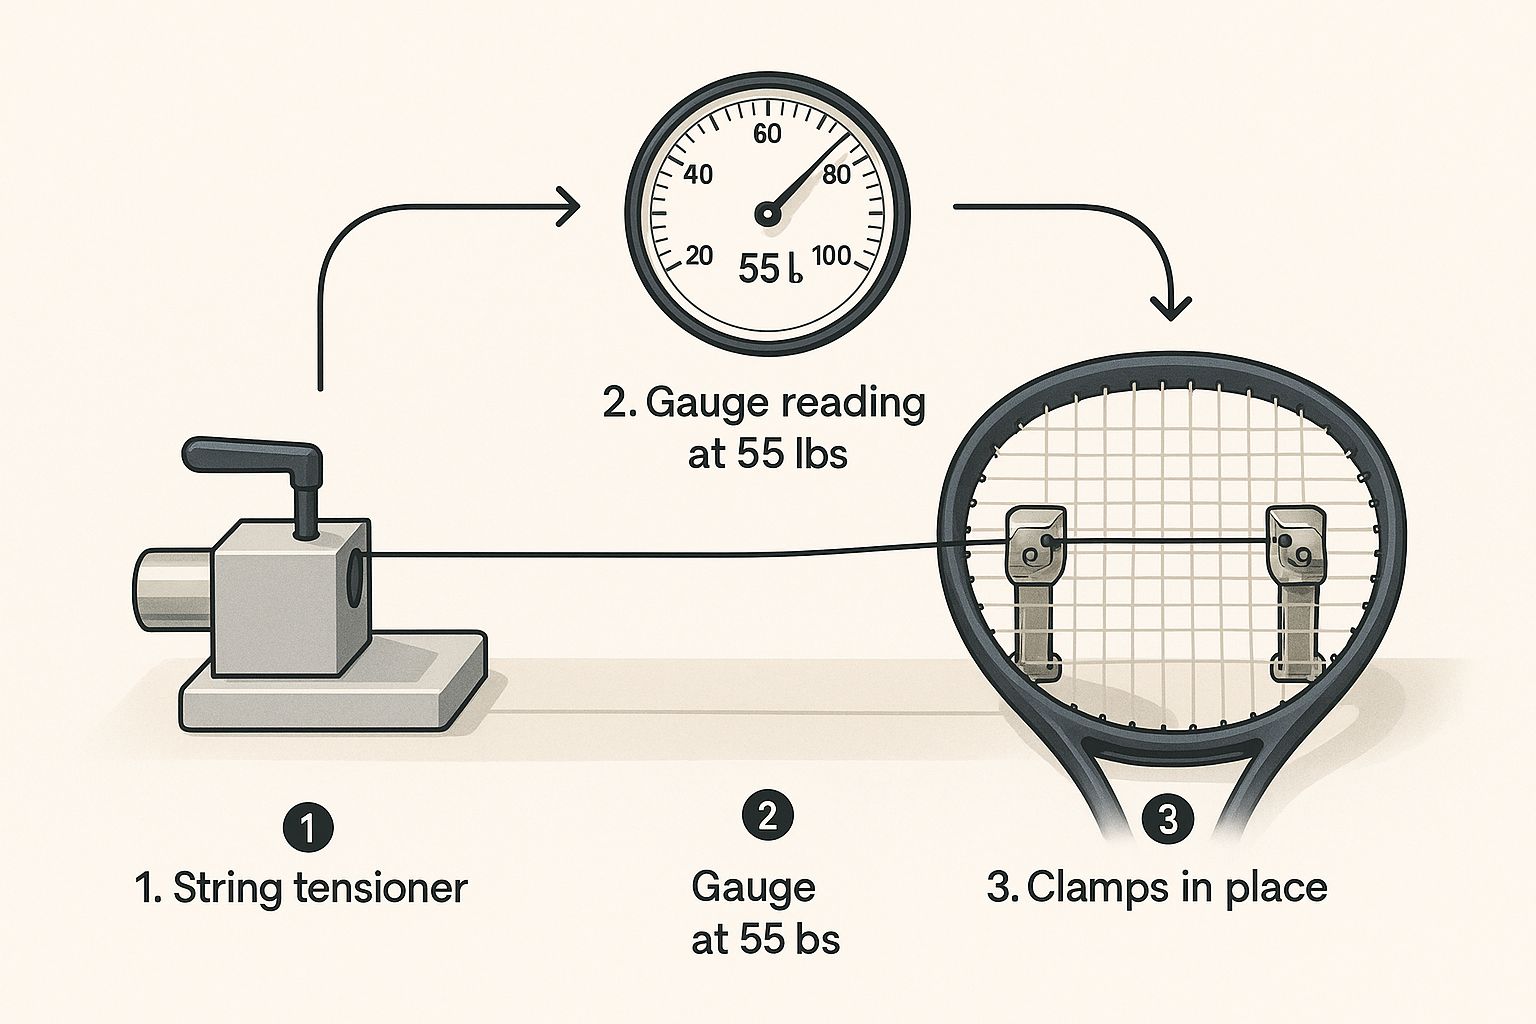
Here, the tensioner is pulling a main string to a precise 55 lbs, while the other clamp holds the previous string securely, ensuring no tension is lost between pulls. It's a beautiful thing.
Achieving Consistent Tension Across the Board
From here on out, consistency is your north star. You'll continue by working your way out from the centre, alternating from one side to the other. Pull tension on a main string, clamp it, then move to its mirror-image partner on the opposite side and do the same. This balanced, one-for-one approach keeps the pressure on the frame symmetrical and prevents any warping.
As you get into a rhythm, keep these pointers in mind:
- No Weaving: For the main strings, there's no weaving involved. You're just threading them straight down from the head to the throat. The weaving comes later with the crosses.
- Shared Holes: Keep an eye out for shared holes in the grommets. These are holes where both a main and a cross string will eventually need to pass through. Be careful not to block them off.
- Clamp Placement: Always, always place your clamps as close to the frame as you can get them right after pulling tension. This is the best way to minimise "tension drop-off," a common headache for beginners learning how to restring a tennis racket.
By following this methodical process, you’ll ensure every single main string is pulled to the exact same tension. This creates a beautifully uniform string bed and sets you up perfectly for the next stage: weaving the cross strings.
Right then, you’ve got the main strings in and looking good. Now comes the part that really brings the string bed to life: weaving and tensioning the cross strings.
This is where a steady hand and a bit of patience pay off. At Mantis, we've talked countless players through this, and we know that a consistent weave is every bit as important as consistent tension. We also know you're keen to get playing, which is why we’ve put together resources like our definitive Mantis guide to tennis racket strings to help you pick the perfect string for your game before you even start.
The technique for the crosses feels quite different from the mains. You’ll be carefully threading the string over and under the mains in an alternating pattern. Grab your second 6-metre piece of string and anchor one end at the top of the frame, usually with a starting clamp or a secure knot, depending on what your racket’s instructions say.
The Art of the Weave
Your first cross string sets the precedent for all the others. Start weaving it across the mains, following a simple "over, under, over, under" sequence. The key here is to be meticulous. Just one mis-weave—going over when you should have gone under, or the other way around—can throw off the whole string job.
The very next cross string needs to follow the exact opposite pattern. So, if your first string went over the first main, this one must go under it. This creates that classic checkerboard look that defines a tennis racket's string bed and, more importantly, it's what locks the mains in place to give you that feel and control you're after.
Weaving can be the most time-consuming part of learning how to restring a tennis racket, but it’s also one of the most satisfying. Take your time, double-check your work on each pass, and you'll avoid the frustration of having to undo and re-weave.
A common snag for beginners is string burn. It happens when you pull the cross string through the mains too fast, creating friction that can nick or even fray the string. The fix is simple: guide the string through gently. Don’t saw it back and forth against the mains.
Maintaining Tension on the Crosses
Once your first cross string is woven, it's time to pull tension. Feed the end into your tension head, pull it to your target tension, and clamp it off securely near the frame—just like you did with the mains.
As you work your way down the racket, you'll fall into a rhythm:
- Weave the String: Carefully follow that alternating "over/under" pattern.
- Pull Tension: Let the machine do its job and pull the string to the correct tension.
- Clamp Securely: Lock it in place with a clamp as close to the frame as you can get it.
You'll quickly notice the cross strings at the top and bottom of the racket are much shorter than those in the centre. These shorter pulls need less string, but they must have the exact same tension as the longer ones in the middle. Your machine handles this consistency, which is absolutely vital for a uniform playing surface.
Tying the Finishing Knots
After you've woven and tensioned that final cross string, you'll be left with a tail of string that needs tying off. This is a critical moment. A sloppy knot can unravel, causing a sudden loss of tension and undoing all your hard work.
Here at Mantis, we always recommend using a proper stringing knot like the Parnell knot or a solid double half-hitch. These knots are designed specifically for stringing; they're compact, incredibly secure, and lock in tension brilliantly. It's well worth practising them a few times before you tie the real ones.
Once it's tied, snip the excess string close to the knot for a clean, professional finish. With your four knots tied (two for the mains, two for the crosses), the core of the stringing job is done. Great work.
Right, you've done the hard work. The knots are tied, the string bed is woven and tensioned, and your racket is looking almost ready for action. But taking a few minutes for these final checks is what really separates a good string job from a great one.
Here at Mantis, we see these finishing touches as more than just a tidy-up; they're about building your confidence and ensuring the racket performs exactly as it should. It’s one thing to have the right skills, but understanding why these details matter is just as important. Our guide on how to choose a tennis racket is a great read if you want to connect these hands-on skills with the racket's design.
First things first, let's straighten those strings. They’ll have shifted around during the tensioning process. Just use your fingers or a stringing awl to gently nudge the mains and crosses into a perfect, neat grid. An orderly string bed doesn't just look professional—it guarantees a consistent response when you strike the ball.
Next, grab your pliers and give the knots one last firm tug. You want to be sure they’re seated securely against the frame. A loose knot is the quickest way to lose tension and undo all your hard work. Finally, give the string bed a quick tap with your finger for the "ping test." Over time, you'll become instantly familiar with the satisfying sound of a fresh string job at your go-to tension.
Solving Common Restringing Problems
Even the most seasoned stringers run into problems now and then. Don't worry. Learning how to troubleshoot these little hiccups is a massive part of mastering how to restring a tennis racket at home.
- Blocked Grommets: You’re trying to thread a string, and it just won’t go through. It happens. Never force it. The best fix is to take your awl and gently poke through from the opposite side to clear the path. If you notice the grommet itself is cracked or badly damaged, it’s always best to replace it.
- Mis-weaves: You’ve just finished a row and spot it—an "over" where there should have been an "under." Don't panic. If it’s the string you just wove, simply un-weave it and do it again properly. If you spot the mistake several rows back, it’s a judgement call. A single mis-weave won’t ruin the racket, but it will create an inconsistent spot in the string bed. For the best result, it’s always worth fixing.
- Running Out of String: The classic beginner's mistake, but one we've all made. If you come up short on a main or a cross, there's really only one solution: you have to cut out that set of strings and start again with a longer piece. It's frustrating, we know, but it’s a lesson in measuring that you'll only need to learn once.
Think of these little errors not as failures, but as learning opportunities. Each one makes you a more competent and confident home stringer. Correcting a mis-weave or clearing a blocked grommet is how you build real-world skill.
Knowing When to Restring Again
So, your racket is perfectly strung and ready for the court. How do you know when it's time to do it all over again?
A good rule of thumb for players in the UK is to match your restringing frequency to how often you play. As a general guideline followed by many UK coaches, if you're on court 1–3 times a week, you should plan to restring 3–4 times per year.
Of course, keep an eye out for physical signs, too. Look for deep grooves where the strings cross, a lot of string movement after hitting a shot, or just a noticeable drop in power and control. For a deeper dive, you can find more insights for UK players on restringing frequency at Tennis Leo.
Your Racket Restringing Questions Answered
Even when you feel you've got the hang of the basic steps, a few questions always seem to pop up. It's the finer details that turn a good string job into a great one. To help you feel completely confident in your new skill, we at Mantis have pulled together the most common queries we hear from players just like you. And if you want to go even deeper on how different strings impact your game, our definitive Mantis guide to tennis racket strings is a brilliant next step.
Think of this as the troubleshooting guide for the personal choices and potential pitfalls every home stringer eventually runs into.
How Do I Choose The Right String Tension?
Finding your ideal tension is a personal journey. There’s no single "correct" number—it’s all about trading power for control until you find the perfect balance for your game.
Here's the general rule of thumb:
- Lower Tensions (48-52 lbs): This range gives you more power, thanks to a greater 'trampoline' effect from the string bed. It also provides a more comfortable, arm-friendly feel, making it a great choice for players hunting for extra pop or those who’ve struggled with arm issues.
- Higher Tensions (55-60+ lbs): Looking for pinpoint control? This is your zone. The ball stays on the string bed for a fraction of a second less, which rewards players who generate their own power with enhanced feel and precision.
Our advice? Start in the middle of your racket's suggested tension range. Play with it, see how it feels, and then make small adjustments of +/- 2 lbs on your next string job. Keep tweaking until you find what works for you.
Remember that your string material makes a huge difference. Stiff polyester strings, for example, are almost always strung at a lower tension—often 4-5 lbs less—than a softer multifilament or synthetic gut to achieve a similar on-court feel.
What Is A One-Piece vs. Two-Piece String Job?
You’ve probably heard stringers talk about one-piece and two-piece methods. So what’s the difference? A two-piece string job is the modern standard, and it's exactly what it sounds like: one piece of string for the mains and a second, separate piece for the crosses. This results in four knots.
On the other hand, a one-piece job (sometimes called 'around the world') uses a single, continuous length of string for the entire racket, finishing with just two knots. While it’s an old-school technique, the overwhelming majority of today's rackets are designed specifically for the two-piece method. It's generally easier to perform consistently and is considered to place less uneven stress on the frame during the stringing process.
Can I Damage My Racket While Stringing It?
Yes, it is possible to damage a racket while stringing it, but we can reassure you: it is almost entirely avoidable with a bit of care and attention to detail.
When damage does happen, it's usually down to one of a few key errors:
- Mounting the frame incorrectly or clamping it down way too tightly in the machine.
- Applying tension unevenly (for example, by stringing all the mains on one side first before starting the other).
- Using the wrong pattern when you cut out the old strings.
By diligently following the step-by-step instructions in this guide and paying close attention to the manual for your specific stringing machine, you can virtually eliminate the risk of causing damage like warping or cracking.
Mantis believes that true performance comes from equipment crafted with purpose and precision. Take control of your game by exploring our range of rackets, strings, and accessories, designed for players dedicated to progress. Visit us at https://mantissport.com to find your perfect setup.