


Learning that tennis racket stringing is about so much more than just fixing a broken string. It’s about taking complete control over your gear and how it performs. Once you get the hang of it, you can fine-tune your racket’s feel, power, and precision to perfectly suit your game, giving you a real edge on the court.
At Mantis, we offer a bespoke stringing service from our Tom, UK based 'Master of Stringing' (yes that's an official qualification), so that you can be sure your new Mantis racket will be ready to use as soon as it drops at your door. He strings all our rackets using a top of the range stringing machine that is regularly calibrated to make sure his string tension measurements are spot on.
Your Essential Tennis Racket Stringing Guide
Welcome to your complete guide on racket stringing. Think of this less as a maintenance chore and more as a way to unlock your racket’s true potential. We're going to move beyond generic advice and get into the specific techniques that make the difference between an amateur job and a professional one. You'll gain a much deeper connection to your equipment, understanding the crucial link between string, tension, and your results on the court.
This guide breaks down the real benefits of DIY stringing, from the significant cost savings you'll see over time to the precise control you'll gain over how your racket behaves. Of course, to get the most out of stringing, you need to understand your frame first. Our article on how to choose a tennis racket offers some great foundational knowledge that pairs perfectly with the skills you'll learn here.
Why Mastering Stringing Matters
The small details of a string job directly impact every single shot you hit. A racket’s performance isn't set in stone; it’s a dynamic system shaped by string type and tension. Here in the UK, players and coaches really understand this critical link.
The Lawn Tennis Association (LTA) confirms that string tension and type are vital factors that shape a racket's control, power, and spin. This is why you see such a variety of setups, even at the club level.
Around the UK, players often lean towards synthetic gut or polyester strings, which hit a sweet spot between durability and playability. As for tension, most club players settle somewhere between 50 and 60 pounds. Dropping the tension a bit gives you more power, while tightening it up offers that extra bit of control you need for pinpoint shots.
This guide will set you up for a practical, step-by-step journey, making sure you feel confident turning your racket into a finely tuned instrument. By the end, you'll be ready to not only string your racket but to do it with real precision.
Gathering Your Stringing Tools and Materials
Before you even think about learning how to string a tennis racket, you need to get your workshop in order. Just like a chef needs their knives, a stringer is only as good as their tools. Trying to string a racket without the proper equipment is a recipe for frustration and, worse, a damaged frame. The right gear is what ensures you get a precise, safe, and professional result you can actually be proud of.
The biggest piece of the puzzle, and your most significant investment, will be the stringing machine. This is the absolute centrepiece of any stringing setup, holding the racket securely while you apply accurate tension. While the top-end electronic machines can be seriously pricey, a quality manual machine—either a drop-weight or a lockout crank model—is a fantastic starting point for any home stringer in the UK. A good one will serve you well for years.
Beyond the machine, you'll need a small but mighty collection of hand tools. Think of them as the supporting cast that makes the whole performance possible.
Your Essential Hand Tool Checklist
Having these tools ready and within arm's reach will make the stringing process much smoother and more professional. Each one has a very specific job that contributes to a high-quality string bed.
- Sharp Nippers or Cutters: You'll need these for two key moments: cutting out the old strings and cleanly trimming the new string after tying off your knots. Using dull cutters can fray the string ends, which makes them a nightmare to thread through tight grommets.
- Bent-Nose Pliers: Invaluable. You'll use these for guiding strings through tricky spots and, crucially, for pulling knots tight. Their angled tip gives you much better leverage and access than standard pliers ever could.
- Starting Clamp: This specialist clamp holds the very first string securely in place, giving you a solid anchor point to begin tensioning. Honestly, it's a non-negotiable tool if you want to start the job properly.
- Awl or Stringing Awl: A simple pointed tool used for clearing out blocked or tight grommet holes. A good awl saves you from trying to force a string through, which is a surefire way to cause damage.
A classic mistake I see new stringers make is trying to improvise with household tools. Please don't. Using anything other than purpose-built stringing tools can easily lead to scratched frames, damaged grommets, and inconsistent tension—ultimately defeating the whole purpose of stringing your own racket.
Once your tools are organised, it’s time to choose your ammunition: the strings. This is where you can really start to customise your racket's feel and performance.
Choosing the Right Tennis Strings
The world of tennis strings can feel completely overwhelming. Every brand markets its product as the secret to unlocking more power or spin. In reality, though, strings fall into just a few main categories, each with its own distinct character. Understanding these differences is absolutely crucial for any player serious about learning how to string a tennis racket to their advantage.
If you want to go deeper on this, the definitive Mantis guide to tennis racket strings is an excellent resource that breaks down the options in great detail.
Think about it this way: a heavy-hitting baseline player who breaks strings all the time has completely different needs from a touch player who prizes comfort and feel. A pro like Coco Gauff, for example, uses a polyester string (Luxilon Alu Power) at around 53 lbs—a setup built for maximum control and spin to tame her powerful game.
To help you find your way, here’s a quick comparison of the main string types you’ll come across.
Tennis String Comparison for UK Players
This table breaks down the most common types of tennis strings, helping you choose the right one based on what matters most to your game: playability, durability, or comfort.
| String Type | Primary Benefit | Best For | Average Lifespan |
|---|---|---|---|
| Natural Gut | Unmatched feel & power | Touch players, those with arm issues | Low |
| Polyester (Poly) | Durability & spin potential | Frequent string breakers, aggressive baseliners | High |
| Multifilament | Arm comfort & playability | Players seeking a gut-like feel without the cost | Medium |
| Synthetic Gut | All-around value & performance | Recreational players, beginners, budget-conscious players | Medium |
So, what does this mean for you? If you generate plenty of your own power and want to add more spin and durability, a polyester string is a fantastic choice. On the other hand, if you've had issues with tennis elbow or just prefer a softer, more forgiving string bed, a multifilament offers brilliant shock absorption. Your choice directly shapes how the racket plays, so take a moment to consider your own style carefully.
Properly Preparing and Mounting Your Racket
A professional-quality string job starts long before you even touch the new set of strings. This prep stage is where you lay the groundwork for a flawless result, and rushing it is one of the most common mistakes I see. It’s a shortcut that can easily compromise not just the string bed's performance, but the structural integrity of the racket frame itself.
First things first, let's get those old strings out. And believe me, there's a definite right and wrong way to do this. Whatever you do, never start at one end and cut them all out in sequence. This creates a sudden, lopsided release of tension that can warp or even crack the frame—a catastrophic and totally avoidable error.
The Correct Way to Cut Out Old Strings
The only safe way is to work from the centre outwards, alternating between the main and cross strings. This ensures the pressure bleeds off gradually and evenly across the entire frame.
- Start in the Middle: Find the two centre mains and the two centre crosses. Snip these four strings first.
- Work Outwards Alternately: From there, move outwards, cutting one or two main strings, then one or two cross strings. Keep this pattern going, moving from the middle of the racket towards both the tip and the throat.
- Clear the Frame: Once everything is cut, carefully pull out all the old pieces.
This methodical approach prevents the kind of dangerous stress that can ruin a perfectly good frame. It might seem a bit over-the-top, but it’s a non-negotiable habit that protects your investment and is the hallmark of any careful stringer.
Inspecting Your Grommets and Frame
With the frame bare, you've got the perfect opportunity for a thorough inspection. Pay close attention to the grommets—those little plastic inserts lining the string holes. They are your new strings' first line of defence against the sharp edges of the frame.
Look for any signs of cracking, splitting, or excessive wear where the old strings have dug in. A single damaged grommet can act like a tiny knife-edge, causing a brand-new set of strings to pop prematurely. Replacing a worn grommet strip is a small job that can save you the immense frustration of a failed string job just a few games into a match.
While you're at it, run your fingers along the entire frame to feel for any hairline cracks or impact damage you might not have noticed before.
A huge number of premature string breaks have nothing to do with the string itself, but a worn-out grommet. Overlooking this simple check is like putting brand new tyres on a car with a nail sticking out of the wheel arch—it's only a matter of time before you have a problem.
Mounting the Racket Securely
Finally, it’s time to get the racket onto your stringing machine. A secure mount is absolutely critical for an accurate job. The goal is to hold the frame firmly in place without squeezing or distorting its natural shape.
Most modern machines use a six-point mounting system, which is widely considered the gold standard for a reason. It uses six support points—two at the head, two at the throat, and two on the sides—to distribute clamping pressure evenly. This robust support is essential to counteract the immense forces applied during tensioning, which can exceed 50-60 pounds of pull on every single string.
Make sure each mounting post makes firm but gentle contact with the frame. The racket should be completely immobile, with zero wiggle or play. A securely mounted racket provides a stable platform, and that's the foundation for achieving the consistent tension that defines a top-quality string bed.
Right, you’ve got your racket mounted and ready to go. Now for the really satisfying part: weaving the string bed. This is where your racket starts to look and feel like a proper performance tool.
It’s a two-stage process. First, we'll tackle the main (vertical) strings, which are the backbone of your string job. Then, we’ll weave in the cross (horizontal) strings to complete the hitting surface. Both steps need a steady hand and a bit of focus, but the rhythm is easy to pick up.
Installing the Main Strings
The mains run from the throat to the head of the racket, and they’re responsible for a huge part of the racket's power and feel. Think of this as laying the foundation.
First, you need to measure out your string. For a standard two-piece stringing job (which is what I'd always recommend), you'll just cut your string set in half. A typical set is about 12.2 metres (40 feet) long, so you'll have a piece of roughly 6.1 metres to work with for the mains.
Start by finding the centre grommets at the head of the racket. Feed one end of your string through one of them, down to the corresponding grommet at the throat, and pull it through until you have an equal length of string on both sides. You’ve just set up your first two main strings.
From here, you’ll work from the centre outwards, tensioning one string at a time.
- Anchor your start: Use your starting clamp to secure one of the strings on the outside of the frame. This gives the machine something to pull against.
- Pull the first string: Pop the other string into the tension head and pull it to your desired tension. Once the machine has pulled tight, lock that string down with one of the machine's fixed clamps.
- Alternate and repeat: Now, release the tension head, thread that same string through the next open grommet, and pull it to tension again. You'll keep repeating this, alternating between the left and right sides of the racket. This ensures you apply pressure evenly across the frame, which is vital to avoid warping it.
A critical tip I learned the hard way: be deliberate with your clamps. Get them as close to the frame as you can without actually touching it. If a clamp is too far away, you can lose a bit of tension between the pull and the clamp, which leads to an inconsistent feel across the string bed.
Once all the mains are in place, you’ll need to tie off the very last string you pulled. A good, solid knot is essential here. A double half-hitch or a proper stringer’s knot will make sure all your hard work stays put.
The Art of Weaving the Cross Strings
With the mains forming a neat set of vertical lines, it’s time to weave the crosses. This is where you create the classic grid pattern, and it demands your full attention. Weaving a string incorrectly is a classic rookie mistake, but it's easily avoided if you’re methodical.
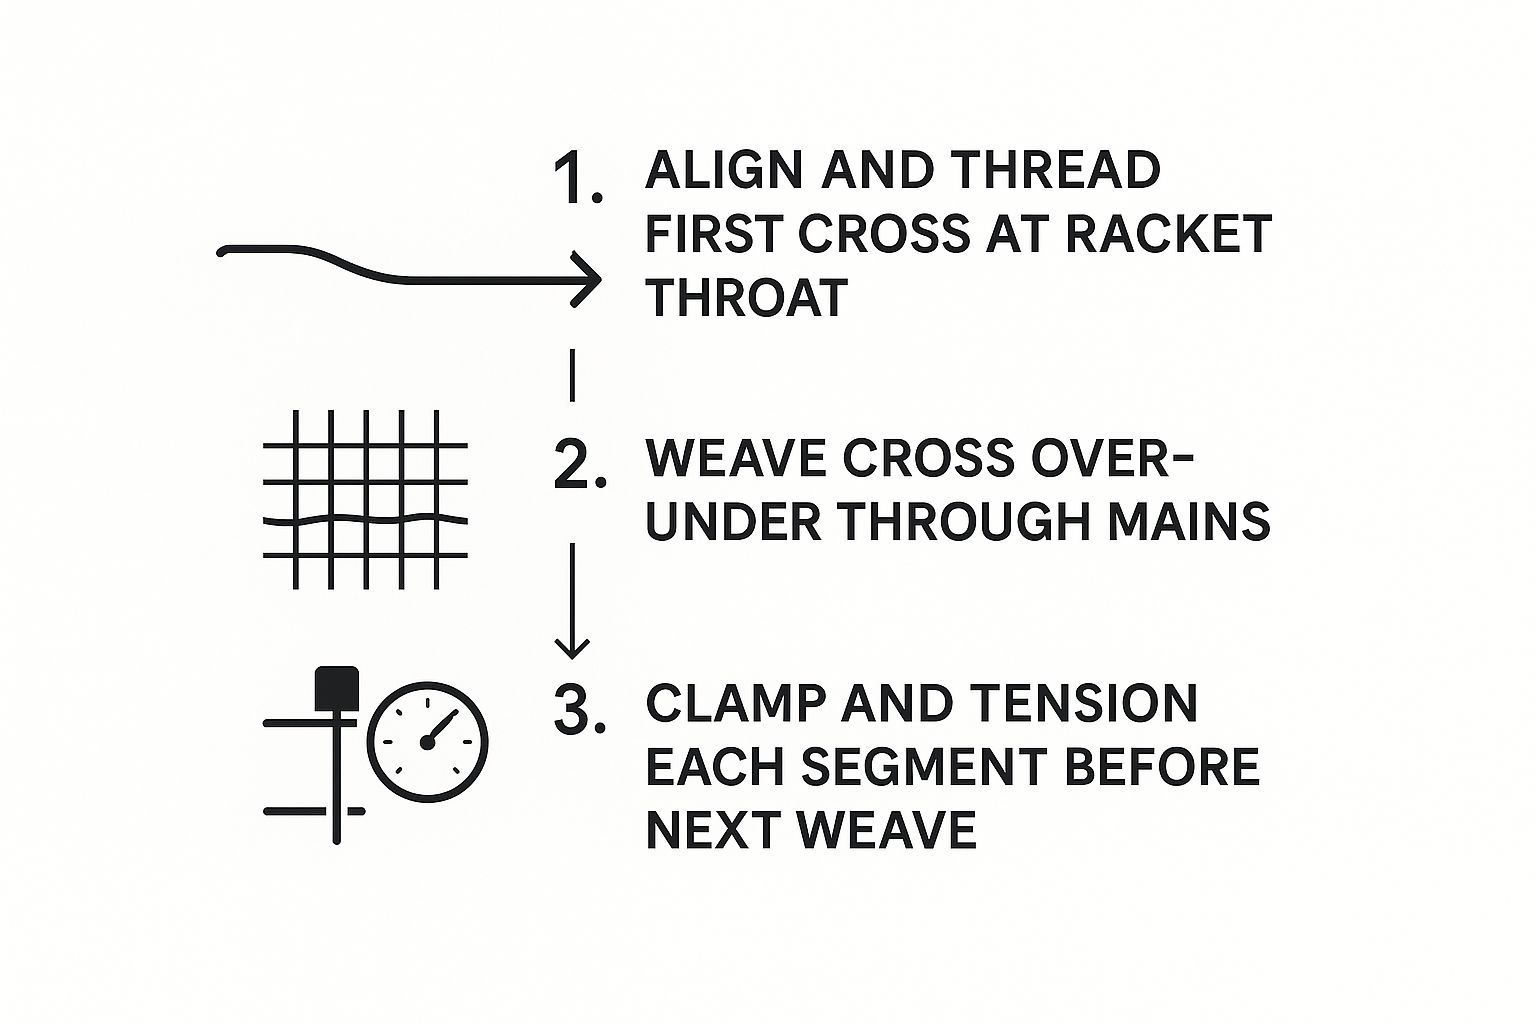
This little visual really captures the flow: thread, weave, and then tension and clamp. You simply repeat that cycle for every cross string, ensuring each one is locked in securely before you move to the next.
You'll start weaving at the top of the racket, closest to the head. The rule is simple: you must alternate. If the main string goes over the last cross, it must go under the next one. You'll continue this over-under pattern all the way across the racket.
Then, for the next cross string down, you do the complete opposite.
For instance, if your first cross string followed this pattern: Over, Under, Over, Under...
Your second cross string must be: Under, Over, Under, Over...
This interlocking sequence is what gives the string bed its stability. Take your time here. If you get distracted, just pause and check your last row before pulling tension. Trust me, trying to fix a mis-weave after you’ve already clamped another string on top of it is a real headache.
One of the biggest hurdles when weaving crosses is string burn. This happens when you pull the cross string through the mains too fast. The friction creates just enough heat to notch or weaken the strings. To avoid it, pull the string through smoothly and steadily. Some experienced stringers even use their fingers to gently lift the mains, creating a cleaner path for the cross.
Maintaining Consistent Cross Tension
Getting the tension right on the cross strings is just as important as it was for the mains. A common problem is losing a bit of tension on the outermost crosses, which can make the string bed feel mushy near the frame. The secret is to minimise friction as much as possible. As you weave each cross, avoid "sawing" it back and forth against the mains.
It’s also worth noting that you don’t need to panic about tiny fluctuations. Scientific research in the UK, which used high-speed cameras to analyse string behaviour, offers some comfort. The study found that while strings do lose some tension right after stringing, the "dynamic stiffness"—how the string bed actually performs on ball impact—stays remarkably consistent. So, even if there are minor drops, the core performance you've just built in will hold up. You can learn more about the scientific findings on string-bed characteristics by reading the full paper.
After weaving each cross, pull it to tension, and just like with the mains, clamp it securely before starting the next one. Once all the crosses are woven and clamped, tie off the final string with another strong knot. And that’s it—your racket is fully strung and almost ready for the court.
Troubleshooting and Advanced Stringing Tips
Even with the best preparation, things can go sideways during a string job. A clamp might slip, you might spot a mis-weave halfway through the crosses, or a stubborn grommet hole can bring the whole process to a halt. Don't worry—these are common hurdles. Learning how to handle them is what separates a novice from a confident DIY stringer.
This is where you move beyond simply following steps and start developing a real feel for the craft. Knowing how to fix minor errors and apply more advanced techniques won't just improve the quality of your string beds, but it'll save you a ton of time and frustration. Let’s look at a few pro-level adjustments and common problems you might face.
One-Piece vs. Two-Piece Stringing
One of the first big decisions you’ll make is whether to string your racket with one continuous piece of string or two separate pieces—one for the mains, one for the crosses. While some special patterns like the UKRSA 'Around the World' method are designed for one piece, for most modern rackets, two-piece stringing is the superior method.
Frankly, using two pieces just gives you far more control and precision. It lets you set a different tension for the mains and the crosses, a technique called hybrid stringing that many advanced players use to fine-tune their racket's feel. More importantly, it significantly reduces the stress on the frame's head, as you avoid pulling that last main string across the top of the frame just to start the crosses.
Common Stringing Headaches and How to Fix Them
Every stringer, no matter how long they've been at it, runs into issues. The key is not to panic, but to have a plan.
- You've Mis-Woven a String: This is probably the most frequent mistake. If you spot it right after weaving (before tensioning again), it's an easy fix. Just un-weave it and do it again correctly. If you've already tensioned a few more strings over it, you have a choice: either cut out the crosses and start again, or just leave it. A single missed weave is mostly a cosmetic issue and won't noticeably affect performance.
- A Clamp Slips Just After Tensioning: This is frustrating because it means you’ve lost tension on that string. The fix is simple: release the string from the tension head, re-clamp the previous string if needed, and pull the problem string to tension again. To stop it from happening again, make sure your clamps are clean and calibrated correctly.
- A Grommet Hole Is Blocked: Sometimes a shared hole gets clogged with the first string. Whatever you do, don't try to force the second string through. Instead, grab your awl and gently work it in alongside the existing string to open up a clear channel.
The most important thing here is attention to detail. Most errors happen when a stringer gets distracted or rushes. A careful, methodical approach is your best defence against having to backtrack and fix mistakes.
To Pre-Stretch or Not to Pre-Stretch
Pre-stretching is exactly what it sounds like: pulling a string at high tension before you install it in the racket. It’s a technique most often used with natural gut or multifilament strings, which are inherently more elastic.
So, why bother? The main benefit is that it removes some of the initial "settling" tension loss, meaning your racket will maintain its desired playability for slightly longer. Polyester strings, being much stiffer, see very little benefit from pre-stretching, so don't waste your time with those.
For example, if you're stringing a soft multifilament at 55 lbs, pre-stretching it might help it feel like it's holding that tension for an extra match or two. It's a small gain, but for players who are highly sensitive to feel, it can make a real difference. It’s an advanced touch that shows you really understand how different string materials behave under stress.
Final Checks and Long-Term Racket Care
Tying the last knot doesn't mean the job is done. The few minutes you spend right after stringing are what separate a decent job from a professional one. These final quality checks are crucial, ensuring the racket doesn't just look the part but performs safely and predictably on the court.
First up, give the entire string bed a good, thorough look. Scan for even spacing between all the strings and double-check for any obvious weaving mistakes you might have missed along the way. A single mis-weave isn't a total disaster, but it’s a clear sign to be more attentive next time. Pay close attention to your knots, too. They should be pulled tight, look clean, and be trimmed neatly with about 3-5mm of string left. A loose or poorly tied knot is simply a point of failure waiting to happen.
Straightening for Peak Performance
Next, you absolutely must straighten your strings. Fresh off the machine, strings will always be a bit crooked. If you play with them like this, they’ll quickly notch into each other, which leads to premature breakage and a seriously inconsistent feel.
Using your fingers or a dedicated string straightener tool, gently push the mains and crosses back into a perfect grid. This simple step is vital. It allows the strings to move freely and snap back as they were designed to, which is key for both spin potential and overall durability. It’s a small detail that makes a massive difference.
Don't ever be tempted to skip straightening the strings. Think of it as the final polish on your hard work. A perfectly straight string bed not only looks professional but also protects the integrity and longevity of the strings you just painstakingly installed.
Shifting to Long-Term Racket Care
Now, let's talk about what comes next. A common mistake many players make is waiting for a string to break before even thinking about a restring. But the real enemy of performance isn't a snap—it's tension loss. This process starts the second your racket comes off the stringing machine.
A good rule of thumb, followed by many UK tennis clubs and pros, is to restring your racket as many times a year as you play per week. For instance, if you're on the court twice a week, you should aim for a fresh set of strings roughly every six months. This keeps the feel and control of your racket consistent. Following this kind of routine helps you get the most out of your equipment, and there’s plenty of data to back it up. In fact, research shows that proper maintenance significantly reduces performance issues.
By adopting these final checks and building proactive habits, you're not just learning how to string a tennis racket; you're mastering the art of total racket care. This ensures your gear is always ready to perform at its best, giving you the confidence you need to just focus on your game.
Stringing Questions Answered
Even after you've got the hang of the basic stringing process, questions always pop up. Let's tackle some of the most common ones we hear from UK players and aspiring stringers.
What’s the Best Tension for My Tennis Racket?
The honest answer? There’s no single ‘best’ tension. It’s all about finding your personal sweet spot between power and control. In the UK, most club players stick to a range between 50-60 lbs.
Here’s a simple breakdown:
- Lower tensions (50-54 lbs): This gives you more power. The string bed acts more like a trampoline, launching the ball with less effort from you. It’s also more forgiving on off-centre hits but can feel a bit wild on full swings.
- Higher tensions (55-60+ lbs): This is all about control. A tighter string bed gives you a more direct, connected feel and helps generate more spin. The downside? It's less powerful and can feel harsher on your arm.
If you’re not sure where to start, string your racket right in the middle of its recommended tension range. Play with it for a few hours, then ask yourself: do I need more pop, or do I need to rein my shots in? Adjust by 1-2 lbs on your next string job until it feels just right.
Your ideal tension is a personal preference discovered through experimentation. Start in the middle, get a feel for it on court, and then decide whether you need more power or more control for your next string job.
How Do I Know When to Restring My Racket?
Don't wait for a string to snap! The real enemy here is tension loss. Your strings start losing tension the moment they come off the machine—often shedding about 10% in the first 24 hours alone.
You’ll know it’s time for a restring when the string bed feels mushy or your shots start flying long for no reason. It’s that feeling when the ball sinks into the strings like a trampoline, and you lose all sense of where it's going.
A good rule of thumb for UK club players is to restring as many times a year as you play per week. If you play twice a week, you should be looking to get it restrung every six months or so to keep your racket feeling consistent.
Can I String a Racket Without a Stringing Machine?
While you might see videos of people trying to string rackets with hand-pulling methods, please don't do it. It is strongly discouraged. A proper stringing machine is non-negotiable for two critical reasons.
First, it applies accurate and consistent tension across every single string, which is impossible to do by hand. Second, it holds the racket frame securely to stop it from warping or, even worse, cracking under the immense pressure of the strings. Trying to string a modern graphite racket without one is a surefire way to get a terrible playing experience and risk ruining your frame for good.
At Mantis, we believe that precision gear is the key to unlocking your true potential. We create high-performance rackets, strings, and accessories built for players who are serious about their game. Discover our equipment, crafted with purpose and without compromise, at mantissport.com.